|
|
 THE MOTH WEAPONS SURVIVAL LIFE ON TITAN DOWNLOADS SITE SERVICES LINKS ONLINE PLAY OFFLINE CHALLENGES  |
Occurs around days 13-16 NOTE: This mission requires you to fire a Tac-Nuke. The Police Moth and the Swallow cannot fire a Tac-Nuke or Big-Bob missile. You'll have to use another Moth. You've had plenty of time since the last mission to upgrade and just be greedy. Now Psycho Bob sends you a message asking for you see him about another mission. Go to Psycho Bob's 1 upon recieving this message and you'll see a video where Bob asks you to invade one of the factions' Secret Base and steal some "Unknown Origin" for him. You only need to attack one base and take one piece of Unknown Origin and return it to Bob. I prefer attacking the Laz Secret Base, but the Klamp base is vulnerable, too. It's just a lot easier to get into and out of the Lazarus Secret Base. It's always best to attack the base of a faction that's not gunning for you already. Get amnesty first if you need to. There's an important trick that comes in handy for this and other missions. Target faction enemies before you run a mission that will put you on an Enemies List. Now you're set up to get amnesty right after you complete the mission. If you wait to try double amnesty later, you may find that neither faction has any independent pilots listed as enemies for several days. It is important that you get amnesty quickly after the Unknown Origin mission.
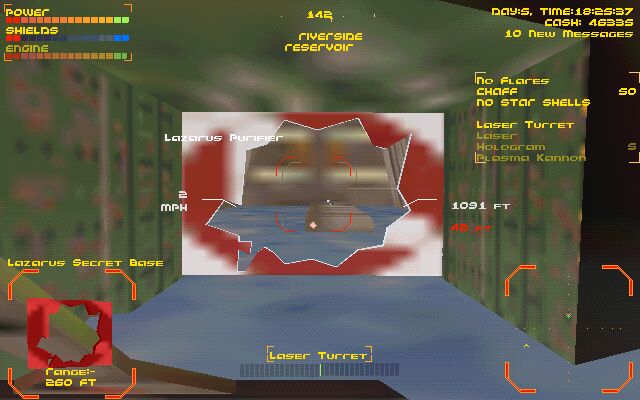 The image above shows the blasted door to the Laz Secret Base. The Unknown Origin is right in front of you. Make sure to target the base, put the door in the center of your HUD, and switch your weapon to Tac-Nuke before firing on the base. Target some Unknown Origin using the "y" key or "Radar Range" on your Nav Menu. Pick it up with your drone while targeting Psycho Bob's. (Note: Bob has outfitted you with a Super Drone as well as a Tac-Nuke. This is why you can now pick up Unknown Origin and you couldn't earlier in the game.) Make sure your drone has returned before taking off. The Laz Guards won't hit you while you're in the Secret Base, so don't panic. Once the drone has returned, find the hole you made in the door and fly through it. You won't be attacked while inside the Base. Bear left and use the compass at the top of your HUD to get to the Riverside Crater. Remember that you can fly low and use your radar cloaking. Don't beat yourself up on the water, though. You can generally just outrun the Guards. Enter Riverside and go straight to Gamma and then to Downtown. Go to Psycho Bob's 1 and deliver the goods. He'll be grateful, but it will be awhile before you hear from him again. You've made an enemy of the Lazarus Family. You can get to Psycho Bob's 1 quicker by flying through Highrise, but you'll pick up some Laz Patrols that may follow you into the Downtown Crater. If you're good enough, take this route and kill the Patrol after leaving Bob's for a quick $1250 from Klamp-G.
Attack the base by going to Riverside and charging up in the Light Well there. Target the Base. Now select your Tac-Nuke and blast the dome. Fly toward the hole once the building is blown up and use directional thrust to go straight down it. Klamp Guards will be targeting you. Don't get nervous or you'll beat yourself up descending into the hole.  The blasted dome of Klamp-G's Secret Base. In the middle is the hole pictured below. 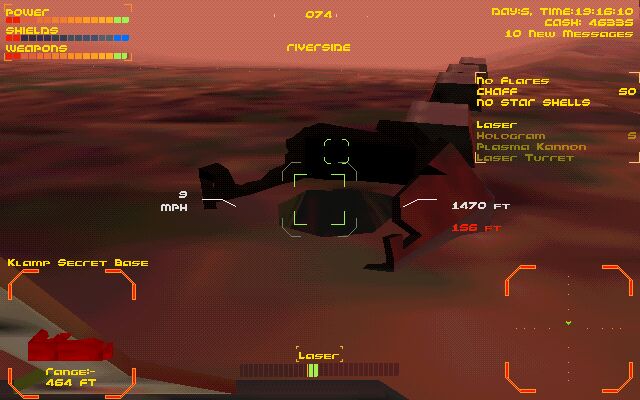 Minimize your bumps against the walls of the hole. Eventually you'll come out in a cavern where some Unknown Origin is stored. Target the Unknown Origin and retrieve it with your drone. Wait in the cavern until your shields build back up to 100%. No one will attack you down there. 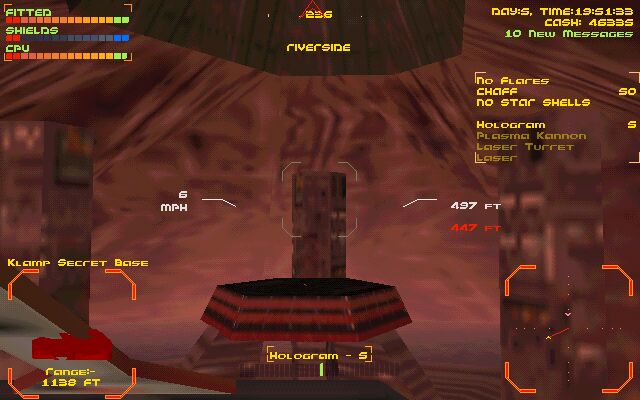 Inside the Klamp-G Secret Base. Pretty cool cave. The Klamp ships won't be able to hit you while you're in here so let your shields build back up to 100% before the bumpy ride out of the hole. In the picture above, you can see the opening to the hole at the top of the image. Target Psycho Bob's 1 while you wait. Carefully center yourself in the hole for your ascent. Rise slowly. You can't be hit until you've nearly cleared the hole. Try to preserve you shields by not bumping into the hole's walls. This means good throttle control and use of directional thrust. Now just run to Psycho Bob's via Resevoir and Highrise. Don't stop for dogfights. Use full throttle, holograms, and flares. Bob will be glad to see you, but he's looking a little rougher. You won't see him again for awhile. NOW WHAT?
Keep an eye out for Fusion Cells. The gang transports are starting to be fitted with them and you'll see pirates and scavengers carrying them as cargo. You may even find one just laying around. Even if you're already fitted with one, they're worth $17,000 each. Not something to ignore.
Click here to find out how to make big bucks by getting all of the Unknown Origin available in both Secret bases and selling them for $99,999 each. |
MISSION 1: Alien Sighting MISSION 2: Klamp Decoy MISSION 3: Mystery Package MISSION 4: Secret Bases MISSION 5: Trigger and Matter MISSION 6: Unknown Origin MISSION 7: Gangboy MISSION 8: Port Blockage MISSION 9: Big Bob MISSION 10: Final Runaround Playing Forever |
|
|
 Attacking the Laz Secret Base: Go to the Resevoir Crater, charge up, and target the Laz Secret Base. Switch weapons to Tac Nuke. Go to the door you targeted before and fire the Nuke. It'll blow open a hole. Fly through the hole.
  Get amnesty quickly. If you don't have any Laz (or Klamp) enemies currently targeted then make it your goal to try double amnesty. You may have to just kill one faction transport to gain amnesty from the opposing faction just to see if the other faction has any independent pilots listed as enemies. You may have to go back and forth two or three times before getting your record cleared with both sides. Stay with it, however, because amnesty is important for the next mission to run smoothly.